Sunday, September 21, 2014

Simple UPS Power Supply

This circuit is a simple form of the commercial UPS, the circuit provides a constant regulated 5 Volt output and an unregulated 12 Volt supply. In the event of electrical supply line failure the battery takes over, with no spikes on the regulated supply.


Notes: This circuit can be adapted for other regulated and unregulated voltages by using different regulators and batteries. For a 15 Volt regulated supply use two 12 Volt batteries in series and a 7815 regulator. There is a lot of flexibility in this circuit. TR1 has a primary matched to the local electrical supply which is 240 Volts in the UK. The secondary winding should be rated at least 12 Volts at 2 amp, but can be higher, for example 15 Volts. FS1 is a slow blow type and protects against short circuits on the output, or indeed a faulty cell in a rechargeable battery. LED 1 will light ONLY when the electricity supply is present, with a power failure the LED will go out and output voltage is maintained by the battery. The circuit below simulates a working circuit with mains power applied: Note that in all cases the 5 Volt regulated supply is maintained constantly, whilst the unregulated supply will vary a few volts. Standby Capacity

The ability to maintain the regulated supply with no electrical supply depends on the load taken from the UPS and also the Ampere hour capacity of the battery. If you were using a 7A/h 12 Volt battery and load from the 5 Volt regulator was 0.5 Amp (and no load from the unregulated supply) then the regulated supply would be maintained for around 14 hours. Greater A/h capacity batteries would provide a longer standby time, and vice versa.

Saturday, September 20, 2014

13V 2A PSU For Handheld Rigs

This compact 13-V/2-A power supply for ham radio rigs and other VHF/UHF portable PMRs is based on the STR2012/13 voltage regulator IC from Sanken Electric Co. Many power supplies for handheld amateur radio rigs are based on the LM317, LM350 or even the good old LM723. Unfortunately, these regulators are invariably associated with a fair number of external components, while we should also consider design factors like total power dissipation and input voltage range. The STR is a hybrid power IC containing a switch-mode power supply. It supplies a fixed output voltage and accepts relatively high input voltages.

Another advantage is its relatively high power dissipation rating. The 5-pin STR is available for 5.1 V, 12 V, 13 V, 15 V and 24 V at an output current rating of 2 A. Here, the STR2012 and STR2013 are suggested for output voltages of 12 V or 13 V respectively. The normal operating voltage of most handhelds being between 12.6 V and 13.8 V, the STR1303 will be the preferred device in most cases. A high-speed crowbar circuit is added to the regulator output. Thyristor Th1 (a TIC106 or 2N4442) is triggered when the output voltage rises above the zener voltage of D2, that is, 15 volts (approximately). When this happens, the thyristor short-circuits the supply output, protecting the radio against over voltage and blowing fuse F1.

13V/2A
Diode D1 acts as a reverse polarity protection, also in combination with fuse F1. To allow for its dissipated heat, the STR regulator should be mounted on a heatsink. Efficiency will be around 80%, with ripple rejection at a comfortable 45 dB. The raw input voltage to the regulator should be in the range 18 to 35 V. The coil, L1, may be selected from the range produced by New-port. The type 1430430 is suggested. If difficult to obtain, then an ordinary triac suppressor type may be used instead.

Note, however, that the inductance of these coils is usually just 100µH, so you have to count the number of turns and add another 0.7 times that number to arrive at about 300 µH. Finally, keep the wire between pin 3 of the STR and ground as short as possible, and connect at least the negative terminals of C1 and C3 to this point to give a ‘star’ type ground connection.

STK4038 60W Amplifier Circuit

STK4038 is an built in AF power amplifier that will deliver 60 watts of output power into a 4 ohm load. The internal fixed current circuitry reduces switch ON/OFF clicks. The IC supports the addition of external circuits for thermal shutdown, pop noise reduction, output short circuit protection etc.

The 60 watt amplifier is designed Depending about the datasheet and performs incredibly well. Capacitor C1 is the input DC decoupling capacitor Which blocks any DC level present at the audio input and C12 is the input by-pass capacitor. R1 is the input resistor.

C10 and C8 seem like the ripple filter capacitors in to the certain and negative power supply rails. R9 and R7 seem like the current limiting resistors in to the internal driver stage although C11 and C3 seem like their corresponding filter capacitors. Resistor R6 feeds back a portion of those output signal in to the inverting input (pin2). Gain these amplifier depends about the value of R6. C9 and R2 forms a Zobel network Which improves the high frequency stability of those amplifier.

LED flasher Circuit using NE555

This is a LED flasher Circuit using NE555. This schema consumes more power, but its advantage is when you need a variable flash rate, like for strobe diagram. You can actually use this schema as a remote control for strobes that have a remote input. Of course, it has many other applications besides strobes.

Simple
  • R1, R2, C1 and the supply voltage determine the flash rate. Using a regulated power supply will do much to insure a stable flash rate. For a variable flash rate, replace R1 with a 1 megohm pot in series with a 22k resistor.
  • The duty cycle of the schema (the percentage of the time LED 1 is on to the time it is off during each cycle) is deterimed by the ratio of R1 to R2. If the value of R1 is low in relationship to R2, the duty cycle will be near 50 percent. If you use both LEDs, you will probably want a 50 percent duty cycle. On the other hand, if R2 is low compared to R1, the duty cycle will be less than 50 percent. This is useful to conserve battery life, or to produce a strobe type effect, when only LED1 is used.
  • The NE555 timer chip can be damaged by reverse polarity voltage being applied to it. You can make the schema goof proof by placing a diode in series with one of the supply leads.
  • The purpose of R3 and R4 is to limit current through the LEDs to the maximum they can handle (usually 20 milliamps). You should select the value of these according to the supply voltage. 470 ohms works well with a supply voltage of 9-12 volts. You will need to reduce the value for lower supply voltages.
  • Rainbow Kits offers several kits to build the above schema. You can also order these kits from RadioShack.com. The Radio Shack catalog numbers (and web pages) are as follows: standard kit with two 5mm red LEDs, (990-0067), kit with two red, two green and two yellow 3mm LEDs, (990-0063), kit with jumbo green LEDs, (990-0048), kit with jumbo red LEDs, (990-0049). You can also buy all the parts to build the schema at your local Radio Shack store, including a schema board (276-159B).
I have built a miniature strobe schema as follows. Use a 250k pot in series with a 4.7k resistor for R1. The 4.7k resistor sets the upper flash rate limit. Use 2.2k for R2. That sets a really short duty cycle. For this schema, you dont use LED 2 or R4. For LED 1, I used a two Radio Shack white LEDs in series and no R-3. The schema runs on a 9 v battery.

Simple 5 Zone alarm Wiring diagram Schematic

This is a complete alarm system with 5 independent zone ssuitable for a small office or home environment. It uses just 3CM IC`s and features a timed entry / exit zone, 4 immediate zones and a panic button. There are indicators for each zone a“system armed” indicator. The schematic is as follows:

5 Zone alarm Circuit Diagram

5


Circuit Notes:
Each zone uses a normally closed contact. These can be micro switches or standard alarm contacts (usually reed switches).Suitable switches can be bought from alarm shops and concealed indoor frames, or window ledges.Zone 1 is a timed zone which must be used as the entry andexit point of the building. Zones 2 – 5 are immediate zones,which will trigger the alarm with no delay. Some RF immunity isprovided for long wiring runs by the input capacitors, C1-C5. C7and R14 also form a transient suppresser. The key switch acts asthe Set/Unset and Reset switch. For good security thisshould be the metal type with a key.

Operation:
At switch on, C6 will charge via R11, this acts as the exitdelay and is set to around 30 seconds. This can be altered byvarying either C6 or R11. Once the timing period has elapsed,LED6 will light, meaning the system is armed. LED6 may be mountedexternally (at the bell box for example) and providesvisual indication that the system has set. Once set any contactthat opens will trigger the alarm, including Zone 1. To preventtriggering the alarm on entry to the building, the concealedre-entry switch must be operated. This will discharge C6 andstart the entry timer. The re-entry switch could be a concealedreed switch, located anywhere in a door frame, but invisibleto the eye. The panic switch, when pressed, will trigger thealarm when set. Relay contacts RLA1 provide the latch, RLA2operate the siren or buzzer.

Phantom Supply From Batteries

Professional (directional) microphones often require a phantom supply of 48 V. This is fed via the signal lines to the microphone and has to be of a high quality. A portable supply can be made with 32 AA-cells in series, but that isn’t very user friendly. This circuit requires just four AA-cells (or five rechargeable1.2 V cells). We decided to use a standard push-pull converter, which is easy to drive and which has a predictable output voltage. Another advantage is that no complex feedback mechanism is required. For the design of the circuit we start with the assumption that we have a fresh set of batteries.

PhantomWe then induce a voltage in the secondary winding that is a bit higher than we need, so that we’ll still have a high enough voltage to drive the linear voltage regulator when the battery voltage starts to drop (refer to the circuit in Figure 1). T1 are T2 are turned on and off by an astable multivibrator. We’ve used a 4047 low-power multivibrator for this, which has been configured to run in an astable free-running mode. The complementary Q outputs have a guaranteed duty-cycle of 50%, thereby preventing a DC current from flowing through the transformer. The core could otherwise become saturated, which results in a short-circuit between 6V and ground.

This could be fatal for the FETs. The oscillator is set by R1/C1 to run at a frequency of about 80 kHz. R2/R3 and D1/D2 make T1 and T2 conduct a little later and turn off a little faster, guaranteeing a dead-time and avoiding a short-circuit situation. We measured the on-resistance of the BS170 and found it was only 0.5 Ω, which isn’t bad for this type of FET. You can of course use other FETs, as long as they have a low on-resistance. For the transformer we used a somewhat larger toroidal core with a high AL factor. This not only reduces the leakage inductance, but it also keeps the number of windings small. Our final choice was a TX25/15/10-3E5 made by Ferroxcube, which has dimensions of about 25x10 mm.

PhantomThis makes the construction of the transformer a lot easier. The secondary winding is wound first: 77 turns of a 0.5 mm dia. enamelled copper wire (ECW). If you wind this carefully you’ll find that it fits on one layer and that 3 meters is more than enough. The best way to keep the two primary windings identical is to wind them at the same time. You should take two 30 cm lengths of 0.8 mm dia. ECW and wind these seven times round the core, on the opposite side to the secondary connections. The centre tap is made by connecting the inner two wires together. In this way we get two primary windings of seven turns each.

The output voltage of TR1 is rectified by a full-wave rectifier, which is made with fast diodes due to the high frequency involved. C4 suppresses the worst of the RF noise and this is followed by an extra filter (L1/C5/C6) that reduces the remaining ripple. The output provides a clean voltage to regulator IC2. It is best to use an LM317HV for the regulator, since it has been designed to cope with a higher voltage between the input and output. The LM317 that we used in our prototype worked all right, but it wouldn’t have been happy with a short at the output since the voltage drop would then be greater than the permitted 40 V.

If you ensure that a short cannot occur, through the use of the usual 6k81 resistors in the signal lines, then the current drawn per microphone will never exceed 14 mA and you can still use an ordinary LM317. D7 and D8 protect the LM317 from a short at the input. There is virtually no ripple to speak of. Any remaining noise lies above 160 kHz, and this won’t be a problem in most applications. The circuit can provide enough current to power three microphones at the same time (although that may depend on the types used). When the input voltage dropped to 5.1 V the current consumption was about 270 mA.

The reference voltage sometimes deviates a little from its correct value. In that case you should adjust R4 to make the output voltage equal to 48 V. The equation for this is: R4 = (48–Vref ) / (Vref / R5+50µA). To minimise interference (remember that we’re dealing with a switched-mode supply) this circuit should be housed in an earthed metal enclosure.

Accu charger with IC LM723C

Circuit of 12 V accu / battery charger with IC LM723C. This Accu charger have input from the first transformer - voltage 220 initially V/110V/240V,  the input voltage lowered approximately 12 VAC, then voltage 12 Volts will be rectified by D1 and then filtered by C1 , then filtered and amplified again by IC LM723 and NPN transistor , output voltage is ready to use to charging the accu / battery.

Accu
Accu charger with IC LM723C
Part list :
T1 = Transformer , DC 12 V
D1 = Diode bridge
C1 = 470uF /50V
C2 = 1000pF
R1 = 4R7
R2 = 5K
R3 = 3K9
R4 = 7K5
R5 = 8K2
VR = 2K - 5K trim
TR1 = MJ2840
IC = LM723C

Friday, September 19, 2014

Gentle Battery Regulator

This small but very effective circuit protects a lead-acid battery (12-V solar battery or car battery) against overcharging by a solar module when the incident light is too bright or lasts too long. It does so by energizing a fan, starting at a low speed when the voltage is approximately 13.8 V and rising to full speed when the voltage exceeds 14.4 V (full-charge voltage). The threshold voltage (13.8 V) is the sum of the Zener diode voltage (12 V), the voltage across the IR diode (1.1 V), and the base-emitter voltage of the 2N3055 (0.7 V). In contrast to circuits using relays or IC amplifiers, the circuit has a gradual switching characteristic, which avoids relay chatter and the constant switching on and off near the switching point produced by a ‘hard’ switching point.

GentleThe circuit does not draw any current at all (auto power-off) below 13 V. Pay attention to the polarization of the Zener and IR diodes when building the circuit. The transistor must be fitted to a heat sink, since it becomes hot when the fan is not fully energized (at voltages just below 14 V). A galvanized bracket from a DIY shop forms an adequate heat sink. The indicated component values are for a 10-W solar module. If a higher-power module is used, a motor with higher rated power must also be used. The circuit takes advantage of the positive temperature coefficient of the lamp filament. The filament resistance is low at low voltages and increases as the voltage rises. This reduces the speed of the fan to avoid generating an annoying noise level. The lamp also provides a form of finger protection.

If you stick your finger into the fan blade, the lamp immediately takes over the majority of the power dissipation and lights brightly. This considerably reduces the torque of the fan. An ordinary 10-W or 20-W car headlight (or two 25-W headlights in parallel) can be used for the lamp. Don’t try to replace the LED by two 1N4001 diodes or the like, replace the ZPY12 by a ZPY13, or fit a series resistor for the LED. That would make the ‘on’ region too large.

Ford E250 Engine Compartment Fuse Box DIagram

Ford E250 Engine Compartment Fuse Box DIagram - Here are new post for Ford E250 Engine Compartment Fuse Box DIagram.

Ford E250 Engine Compartment Fuse Box DIagram


Ford
Ford

Fuse Panel Layout Diagram Parts: A/C heater, remote keyless entry module, powertrain control module, PCM power relay, electroni brake, power seats, power lumbar seats, blower motor relay, ignition switch, fuel pump relay, trailer battery charge relay, trailer adapter battery, trailer back up lamp relay, traile running lamp relay, plug in diode, stop lamp, trailer running lamp, DRL module, horn relay, main light switch, auxiliary battery, ignition system, instrument cluster, 4WABS relay.

Schematic Audio Power Amplifier with IC TDA2822

TDA2822 is manufactered by PHILIPS , its based on this amplifier . Minimum voltage 3 volts and maximum voltage 15 volts. Power output 2 x 1,8 stereo with 4 Ohm impedance. Quiescent current 6 mA , sensitive input is 30 Hz to 18 kHz. See circuit diagram below :

Fuse Box BMW 1992 325i Power Distribution Diagram

Fuse Box BMW 1992 325i Power Distribution Diagram - Here are new post for Fuse Box BMW 1992 325i Power Distribution Diagram.

Fuse Box BMW 1992 325i Power Distribution Diagram


Fuse
Fuse

Fuse Panel Layout Diagram Parts: normal speed relay, horn relay, hhig beam relay, low beam relay, inloader relay, fog light relay.

TDA8922 Audio Amplifier 2x25W

TDA8922general description:


The TDA8922 is a high efficiency class-D audio power amplifier with very low dissipation. The typical output power is 2 × 25 W. The device is available in the HSOP24 power package with a small internal heatsink and in the DBS23P through-hole power package. Depending on the supply voltage and load conditions, a very small or even no external heatsink is required. The amplifier operates over a wide supply voltage range from ±12.5 to ±30 V and consumes a very low quiescent current.


TDA8922 features:


  • High efficiency (∼90%)
  • Operating supply voltage from ±12.5 to ±30 V
  • Very low quiescent current
  • Low distortion
  • Usable as a stereo Single-Ended (SE) amplifier or as amono amplifier in Bridge-Tied Load (BTL)
  • Fixed gain of 30 dB in Single-Ended (SE) and 36 dB in
  • Bridge-Tied Load (BTL)
  • High output power
  • Good ripple rejection
  • Internal switching frequency can be overruled by an external clock
  • No switch-on or switch-off plop noise
  • Short-circuit proof across load and to supply lines
  • Electrostatic discharge protection
  • Thermally protected.

TDA8922 applications:

  • Television sets
  • Home-sound sets
  • Multimedia systems
  • All mains fed audio systems
  • Car audio (boosters).

TDA8922 amplifier diagram, circuit:

TDA8922 pcb layout:


Fuse Box BMW 528I 1982 Diagram

Fuse Box BMW 528I 1982 Diagram - Here are new post for Fuse Box BMW 528I 1982 Diagram.

Fuse Box BMW 528I 1982 Diagram


Fuse
Fuse

Fuse Panel Layout Diagram Parts: normal speed relay, high speed relay, low beam check relay, high beam relay, low beam relay, fog light relay, main relay, purge valve relay, fuel pump relay, horn relay, wiper control unit, unloader relay.

Thursday, September 18, 2014

Fuse Box Ford 1996 Mustang Diagram

Fuse Box Ford 1996 Mustang Diagram - Here are new post for Fuse Box Ford 1996 Mustang Diagram.

Fuse Box Ford 1996 Mustang Diagram


Fuse
Fuse

Fuse Panel Layout Diagram Parts: Turn Signal Lamps, Back-Up Lands, Rear Defroster, Top Relay Coil, Iluminated Entry Module, Hego (5.0), ABS, Low Oil Module, Low Coolant Module, Airbag Module, DRL Module, Safety Cluster Chime, Cluster Warning Lamps, O/D Module, Brake Shift Solenoid, Cluster Gauges, Shift Module, Generator Warning Light, Trunk Lamp, Low Beams, Door Locks,Fuel Pump, Cigar Lighter, EEC Power Relay Coil, Ignition Coil, TFI Module, Starter Relay, Clock Illumination, Speed Control Lamp, Radio, Power Windows, Head Lamps, Power Mirrors, Power Point, Power Seats.

150W Audio Power Amplifier

150W

For an amplifier with 150 Watt in power, may be this is the cheapest one . This amplifier schema built based on two Darlington power transistors TIP 142 and TIP 147, this schema can deliver a blasting 150 W Rms to a 4 Ohm speaker.

TIP 147 and 142 are complementary Darlington pair transistors which can handle 5 A current and 100V, famous for their ruggedness. Here two BC 558 transistors Q5 and Q6 are wired as pre amplifier and TIP 142, TIP 147 together with TIP42 (Q1,Q2,Q3) for driving the transistors. This schema is designed so rugged that this can be assembled even on a common board or even by pin to pin soldering. The schema can be powered from a +/-45V 5A dual power supply. You must try this schema. Its working great.


150W

Notes:

  • Remember TIP 142 and 147 are Darlington pairs. They are shown as coventional transistors in figure for ease. So don’t get confused. Even though each of them have 2 transistors, 2 resistors and 1 diode inside, only three pins, base emitter and collector are coming out. Rest are connected internally. So its quite OK to assume each of them as transistor for ease.
  • Use a well regulated and filtered power supply.
  • Connect a 10K POT in series with the input as volume control if you need. Not shown in schema diagram.

Class AB Power Amplifier Circuit 30w Using Power Transistor


Class AB Power Amplifier Circuit Diagram

30W Class AB power amplifier schema diagram using power transistor. Set the above amplifier up by adjust the variable resistor R1 to maximum and R12 to zero. After this set up is done, the activate / turn on the amplifier. Adjust the R1 so that the measured output offset is between 30 and 100mV. Once set, adjust the R12 slowly to achieve a quiescent current of around 120mA. Keep checking the quiescent current as the amplifier heats up as it might change due to voltage drop changes in the output devices because of the heat. The heatsinks should be 0.6K/W or less for two amplifiers.

Power supply schema for 30W class AB power amplifier:
power
30W Class AB Power Amplifier Circuit, 

Fuse Box Toyota 1997 Corolla Kick Panel Diagram

Fuse Box Toyota 1997 Corolla Kick Panel Diagram - Here are new post for Fuse Box Toyota 1997 Corolla Kick Panel Diagram.

Fuse Box Toyota 1997 Corolla Kick Panel Diagram


Fuse
Fuse

Fuse Panel Layout Diagram Parts: cigar lighter, digital clock display, air conditioning, radio, cassette tape player, tail light, parking lamp, instrument panel light,electric cooling fan, multiport fuel injection, power rear view mirror, stop light, anti lock brake system.

Motional Feed Back Amplifier

This concept has appeared long back in Practical Electronics a UK based Magazine. Based on this concept I designed this circuit during 1981 to 1986 with lots of field trials and modifications, the design was frozen in 1986. I have assembled so many amplifiers for me and for my friends based on this design with various power levels. They are still kicking in so many houses. This concept can be applied to any existing amplifier also. You must listen to believe the crystal clear thumping bass response. crystal clear mid and hi frequencies. Good transient response with very low distortion. Hope you guys  will enjoy the reproduction of this amplifier. In the art of audio sound reproduction it is well-known that the dynamic loudspeaker is more nonlinear and generates more distortion than all the other system components combined. This is particularly true at low frequencies which require large cone excursions where the stiffness of both the inner spider and the outer surround increases rapidly as the cone approaches its peak displacement, resulting in a nonlinear suspension compliance generating high distortion. For example, in a typical high fidelity sound system at a frequency of about 35 Hz the total harmonic distortion of the amplifier might be of the order of 0.01%, whereas the distortion of the loudspeaker might range from about 3.0% to about 50.0%, depending upon the loudness. If this cone motion can be sensed and given as a feed back to the earlier stage of the amplifier, this distortion can be reduced dramatically. Circuit diagram:   Motional Feed Back Amplifier Circuit Diagram Motional Feedback (MFB) was a speaker system developed in the early 1970s by Philips Holland. It introduced a feedback system to the woofers of HiFi loudspeakers, enabling them to achieve a more extended low frequency response in a relatively small enclosure. The key benefits are a very controlled bass response. Any distortion induced by the enclosure or the woofer itself is immediately corrected by the feedback. These hand-built speakers were sounding very good and were quite expensive. As a different approach, instead of using the cone movement, the current flow through the voice can be sensed (the current is proportional to cone movement) and can be used as a cone movement feedback. This novel idea is used in this amplifier design (I don’t claim any originality; this idea has appeared in Practical Electronics UK Magazine – long back – They might have even patented it).the amplifier used here is a standard Philips audio application circuit, with a specification of 40 Watt RMS @ < 0.06% Total Harmonic Distortion into 8 ohms impedance speaker and having a frequency response from 20Hz to 100 KHz, suitably modified for our application. Powersupply Circuit: Motional Feed Back Amplifier Powersupply Circuit Diagram The amplifier is a conventional class B directly coupled quasi complimentary out put stage, operating with single 56Volt supply (no need for a regulated or dual power supply). BC157 is the pre-driver and half supply stabilizer. BD 139 is the driver, a BD139 and a BD140 complimentary pair out put driver stage with 2N3055 as final out put stage. The speaker voice coil current is sensed through 0.47 ohms resistance connected from speaker one end to ground. This signal is given as negative fed back to previous stage through 470 ohms. The half supply at speaker coupling capacitor can be adjusted by varying the 39K resistance (if required you may fix a 100K pre set in the place of 39K and adjust for half supply with no in put signal at junction of both 0.47 ohms of out put transistors and speaker coupling capacitor).

The quiescent current through output transistors can be adjusted with 22 ohms in series with two bias diodes 1N4007. The value for 50mA quiescent current will lie between 15 to 33 ohms for a supply of 56volts. The amplifier can be protected with a simple 1.5Amp fast acting fuse in the positive power supply. the amplifier can be assembled on 40watt Philips amplifier application board or on any standard plain straight line board. All the three driver transistors require cooling clips. (Standard TO220 casing cooling fins). Out put transistors require a good quality extruded alloy heat sink with insulating mounting kit and with a smear of silicon conductive grease, for good conductance of heat.

Electronic Fuse for DC Short Circuit Protection

This is an electronic fuse that protects the load against short schema.

Project Description

Relays must be chosen with a voltage value equals to the input voltage. Don’t omit using the 100uF capacitor with appropriate voltage value with respect to the input voltage. If you can’t provide, you can use C106 instead of BRX46.

Circuit


You can adjust the current with using 10K potentiometer. If you will use the fuse with very high currents, lower the 0R6 5W resistor value (ex. 0R47, 0R33, 0R22 or 0R1). Watt value of the resistor should be increased also.

Wednesday, September 17, 2014

Stereo STK013 audio amplifier circuit

stk
On the amplifier circuit using ic STK, the same as my previous posting. However, in the above circuit has 2 inputs and 2 outputs, or commonly called a stereo amplifier. This issue of power amplifier 2 x 18Watt and has impedance 8. To stress that it takes about 35-38Volt.
Component list :
Resistor
R1 =  390K
R2 = 390K
R3 = 220K
R4 = 220K
R5 = 220K
R6 = 220K
R7 = 100R
R8 = 1R
R9 = 9.1K
R10 = 9.1K
R11 = 1R
Capacitor
C1 = 10uF
C2 = 10uF
C3 = 0.47uF
C4 = 0.47uF
C5 = 220uF
C6 = 0.047uF
C7 = 4700uF
C8 = 100uF
C9 = 1000uF
C10 = 100uF
C11 = 4700uF
C12 = 470uF
C13 = 0.047uF
IC
U1 = STK013

Fuse Box Toyota 1990 Supra Electrical Instrument Diagram

Fuse Box Toyota 1990 Supra Electrical Instrument Diagram - Here are new post for Fuse Box Toyota 1990 Supra Electrical Instrument Diagram.

Fuse Box Toyota 1990 Supra Electrical Instrument Diagram


Fuse
Fuse

Fuse Panel Layout Diagram Parts: wiper relay, A/C amplifier, ABS system, A/C system amplifier, engine oil level, cruise control, A/C auto relay, fog light relay, bulb check relay, seat heater, ignition relay, taillight, fog light relay.

Simple Radiator Temperature Iindicator

This radiator temperature indicator can be designed using electronic schema diagram bellow .Temperature indicator consists of two special zener diode, D1 and D2, connected in series to ensure accuracy of 5.96 V Zener voltage at 25 ° C. As long as the radiator temperature not exceeding 50 ° C, thermal indicator will flash a green LED, one orange will be provided for temperatures of 50 ... 75 ° C and a red LED, for temperatures above 75 ° C.

Simple Radiator Temperature Iindicator  Circuit Diagram


Simple

Zener voltage will increase by 20 mV for each temperature increase of a degree Celsius temperature. Radiator temperature corresponding voltage level is compared with two reference voltages, IC1 and IC2 using. When the temperature reaches 50 ° C, IC2s output goes to logic state "1" so that T3 leads and following ignition with diode D4. At 75 ° C, IC1s output is in logic state "1" and, therefore, T2 and T3 will, so that D3 and D4 lights are off. 

M 3482 Alarm Water Sensor Circuit

This is an easy musical alarm circuit that produces a musical tone when water or some conducting liquid comes in contact with the two sensor wires provided. The circuit is based on four transistors and one melody generator IC (M 3482).

When water comes in contact with the sensors wires A & B, the base of Q1 gets connected with the negative and it conducts. This makes Q2 and Q3 ON. When Q3 is ON the power is available for the music generator circuit and it starts producing 12 totally different melodies one after another. The music continues as long as theres water between the sensor wires. The POT R12 can be used as a volume controller.

Using TDA7056 3W BTL Mono Audio Power Amplifier

For mono output amplifier application,  TDA7056  IC can be your option. Compact but powerful, this integrated schema is contained in a 9 pin medium power package. This device is designed for battery fed portable equipments such as mono recorders, radios and television. To attract the market, TDA7056 has many features such as low power consumption. For more reliable operation, TDA7056 also has short schema proof and ESD (Electro Static Discharge) protected on all pins.  Designing application with this IC should be easy since no external components is needed. To make sure you’ll love this chip, this device also has no switch on/off clicks. Overall, TDA7056 has good stability.

 TDA7056 3W BTL Mono Audio Power Amplifier Circuit Diagram


 tda7056 3w btl mono audio power amplifier

Tester for Inductive Sensors Circuit Diagram

This  tester  uses  a  LED  to  indicate whether an inductive sensor is generating a signal. It can be used to test the inductive sensors used in ABS and EBS systems in cars, with engine cam- shafts and flywheels, and so on. The circuit is built around an LM358 dual opamp IC. The weak signal coming from the sensor (when the wheel is turning slowly, for example) is an AC voltage. The first opamp, which is wired here as an inverting amplifier, amplifies the negative half cycles of this signal by a factor of 820. The second opamp is wired as a comparator and causes the red LED to blink regularly.
 
In order to judge the quality of the signal  from the sensor, you must turn the wheel  very slowly. If the red LED blinks, this means  that the sensor is generating a signal and the  distance between the sensor and the pole  wheel (gear wheel) is set correctly. If the distance (air gap) is too large, the sensor will not  generate a signal when the wheel is turned slowly, with the result that the LED will remain  dark, but it will generate a signal if the wheel  is turned faster and the LED will thus start  blinking. Irregularities in the blinking rate can  be caused by dirt on the sensor or damage to  the pole wheel (gear wheel).
 
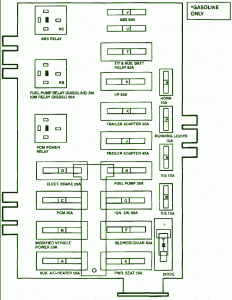
Tester for Inductive Sensors Circuit diagram:


Tester for Inductive Sensors Circuit Diagram

If you connect an oscilloscope to the LED with  the engine running, you will see a square-wave signal with a pattern matching  the teeth of the gear wheel, with a frequency equal to the frequency of the  AC signal generated by the sensor. You can also use this tester to check  the polarity of the connecting leads.  To do this, first dismount the sensor  and then move it away from a metal-lic object. The LED will go on or off  while the sensor is moving. If you now  reverse the lead connections, the LED  should  do  exactly  the  opposite  as  before when the sensor is moved the  same way.
 
The circuit has been tested extensively  in several workshops on various vehicles, and it works faultlessly. The author has also connected the tester to  sensors on running engines, such as the cam-shaft and flywheel sensors of a Volvo truck  (D13 A engine). With the camshaft sensor, the  LED blinks when the engine is being cranked  for starting, but once the engine starts running you can’t see the LED blinking any more  due to the high blinking rate. 

Tuesday, September 16, 2014

Fuse Box Toyota 1995 Supra For The Amplifier Diagram

Fuse Box Toyota 1995 Supra For The Amplifier Diagram - Here are new post for Fuse Box Toyota 1995 Supra For The Amplifier Diagram.

Fuse Box Toyota 1995 Supra For The Amplifier Diagram


Fuse
Fuse

Fuse Panel Layout Diagram Parts: blower motor, center airbag, sensor assembly, cigar lighter, cigar lighter illumination, airbag squib, ashtray illumination, auto antenna control relay, clutch stast switch, combination meter, combination switch, cruise control clutch, daytime running light, ABS laterai acceleration sensor, air inlet control servo motor, amplifier, A/C evaporator temperature sensor, A/C room temperature sensor, solar sensor, ABS ECU.

7 Watt Audio Amplifier Using TDA2003

Amplifier Circuits Diagram

Schematic diagram of a simple 7 watt audio amplifier using TDA2003 Amplifier IC. This is a good IC with many built in features like low harmonic distortion, short circuit protection,thermal overload protection etc. This IC is a upgrade version of TDA 2002 amplifier IC.

7 Watt Audio Amplifier Circuit Diagram :

The circuit is small and using only few components and it is able to deliver 7w output on 12V DC. Assamble the circuit on PCB or veroboard and use heatsink with IC. Input voltage can be between 8 to 18 volt / 0.5A DC.

Fuse Box Toyota 1996 Corolla Diagram

Fuse Box Toyota 1996 Corolla Diagram - Here are new post for Fuse Box Toyota 1996 Corolla Diagram.

Fuse Box Toyota 1996 Corolla Diagram


Fuse
Fuse

Fuse Panel Layout Diagram Parts: cigar lighter, digital clock display, air conditioning system, radio, cassette type player, power rear view mirror, tail light, parking light, license plate light, instrument panel light, multiport fuel injection system, electric cooling fan, power rear view mirror, multiport fuel injection, stop light, antilock brake system, turn signal light, emergency flasher, starting system, anti lock brake system, gauges n meter, open door warning light, interior light, luggage compartment light, trunk light, clock, open door warning light.

Fuse Box Toyota 2000 Celica GT Diagram

Fuse Box Toyota 2000 Celica GT Diagram - Here are new post for Fuse Box Toyota 2000 Celica GT Diagram.

Fuse Box Toyota 2000 Celica GT Diagram


Fuse
Fuse

Fuse Panel Layout Diagram Parts: cigar lighter, sunroof, door lock, stop lamp, fog light, washer, wiper, radio, turn signal, heater, taillight, multi fuse, defogger, Ignition relay, taillight control relay.

Mercedes Explanation Fuse Box Year 1988 190 E 2 3 Diagram

Fuse Box Mercedes 1988 190 E 2.3 Diagram - Below is Fuse Box Mercedes 1988 190 E 2.3 Diagram.

Fuse Box Mercedes 1988 190 E 2.3 Diagram


Fuse
Fuse

Fuse Panel Layout Diagram Parts: combination relay, anti theft alarm, turn/hazard signal, heated rear window wiper motor, power window relay, washer relay, intake manifold, pre heater, power seat relay, auxiliary fuse, power seat, headlamp.

Low drop Regulator with Indicator Wiring diagram Schematic

Even today much logic is still powered from 5 volts and it then seems obvious to power the schema using a standard regulator from a rectangular 9-V battery. A disadvantage of this approach is that the capacity of a 9-V battery is rather low and the price is rather high. Even the NiMH revolution, which has resulted in considerably higher capacities of (pen-light) batteries, seems to have escaped the 9-V battery generation. It would be cheaper if 5 volts could be derived from 6 volts, for example. That would be 4 ‘normal’ cells or 5 NiMH- cells. Also the ‘old fashioned’ sealed lead- acid battery would be appropriate, or two lithium cells.
 

Low-drop
Low-drop Regulator with Indicator Circuit Diagram
 
Using an LP2951, such a power supply is easily realised. The LP2951 is an ever- green from National Semiconductor, which you will have encountered in numerous  Elektor Electronics designs already. This IC can deliver a maximum current of 100 mA at an input voltage of greater than 5.4 V. In addition to this particular version, there are also versions available for 3.3 and 3 V output, as well as an adjustable version.  In this design we have added a battery indicator, which also protects the battery from too deep a discharge. As soon as the IC has a problem with too low an input voltage, the ERROR output will go low and the regulator is turned off via IC2d, until a manual restart is provided with the RESET pushbutton.
 
The battery voltage is divided with a few resistors and compared with the reference voltage (1.23 V) of the regulator IC. To adapt the indicator for different voltages you only need to change the 100-k resistor. The comparator is an LP339. This is an energy-friendly version of the LM339. The LP339 consumes only 60 µA and can sink 30 mA at its output. You can also use the LM339, if you happen to have one around, but the current consumption in that case is 14 times higher (which, for that matter, is still less than 1 mA).
 
Finally, the LP2951 in the idle state, consumes about 100 µA and depend- ing on the output current to be deliv- ered, a little more. 


Source by : Streampowers

Monday, September 15, 2014

New architecture silicon microwave power transistor

high

Above is a new architecture of the transistor which is applied in high voltage vertical FET (HVVFET ™) to achieve high operating voltage and very high power packaging density. This approach offers many advantages to designers of power amplifiers.
High voltage solutions help designers to simplify the matching circuit discrete devices. Achieving high power through the device causing high voltage impedance level, allows the network to the appropriate circuit with fewer components smaller area. As a result, a series of matching not only the smaller, less expensive solutions, but offers higher reliability as well as there fewer parts with the potential to fail. This circuit is suitable also show less loss than a low impedance solution that has a higher transformation 50 ohm impedance ratio desired.